DeepEval 5-min Quickstart
This quickstart takes you from installing DeepEval to your first passing eval in a few
minutes. You'll create a small test case, choose a metric, and run it with
deepeval test run.
By the end of this quickstart, you should be able to:
- Run your first local eval with a test case, metric, and
deepeval test run. - Add tracing when you want to evaluate an AI agent or its internal components.
- Know where to go next for datasets, synthetic data, integrations, and the Confident AI platform.
New to DeepEval? Checkout the introduction to learn more about this framework.
Installation
In a newly created virtual environment, run:
pip install -U deepevaldeepeval runs evaluations locally on your environment. To keep your testing reports in a centralized place on the cloud, use Confident AI, an AI quality platform with observability, evals, and monitoring that DeepEval integrates with natively:
deepeval loginYour browser handles authentication only. After you sign in or create an
account, return to the terminal to enter your name and organization, confirm
the prefilled first-project name, or select one of your existing projects.
DeepEval creates and saves a dedicated project API key automatically. For CI
or other non-interactive environments, pass an existing key with
deepeval login --api-key ....
Configure Environment Variables
DeepEval autoloads environment files (at import time)
- Precedence: existing process env ->
.env.local->.env - Opt-out: set
DEEPEVAL_DISABLE_DOTENV=1
More information on env settings can be found here.
# quickstart
cp .env.example .env.local
# then edit .env.local (ignored by git)Create Your First Test Run
Create a test file to run your first end-to-end evaluation.
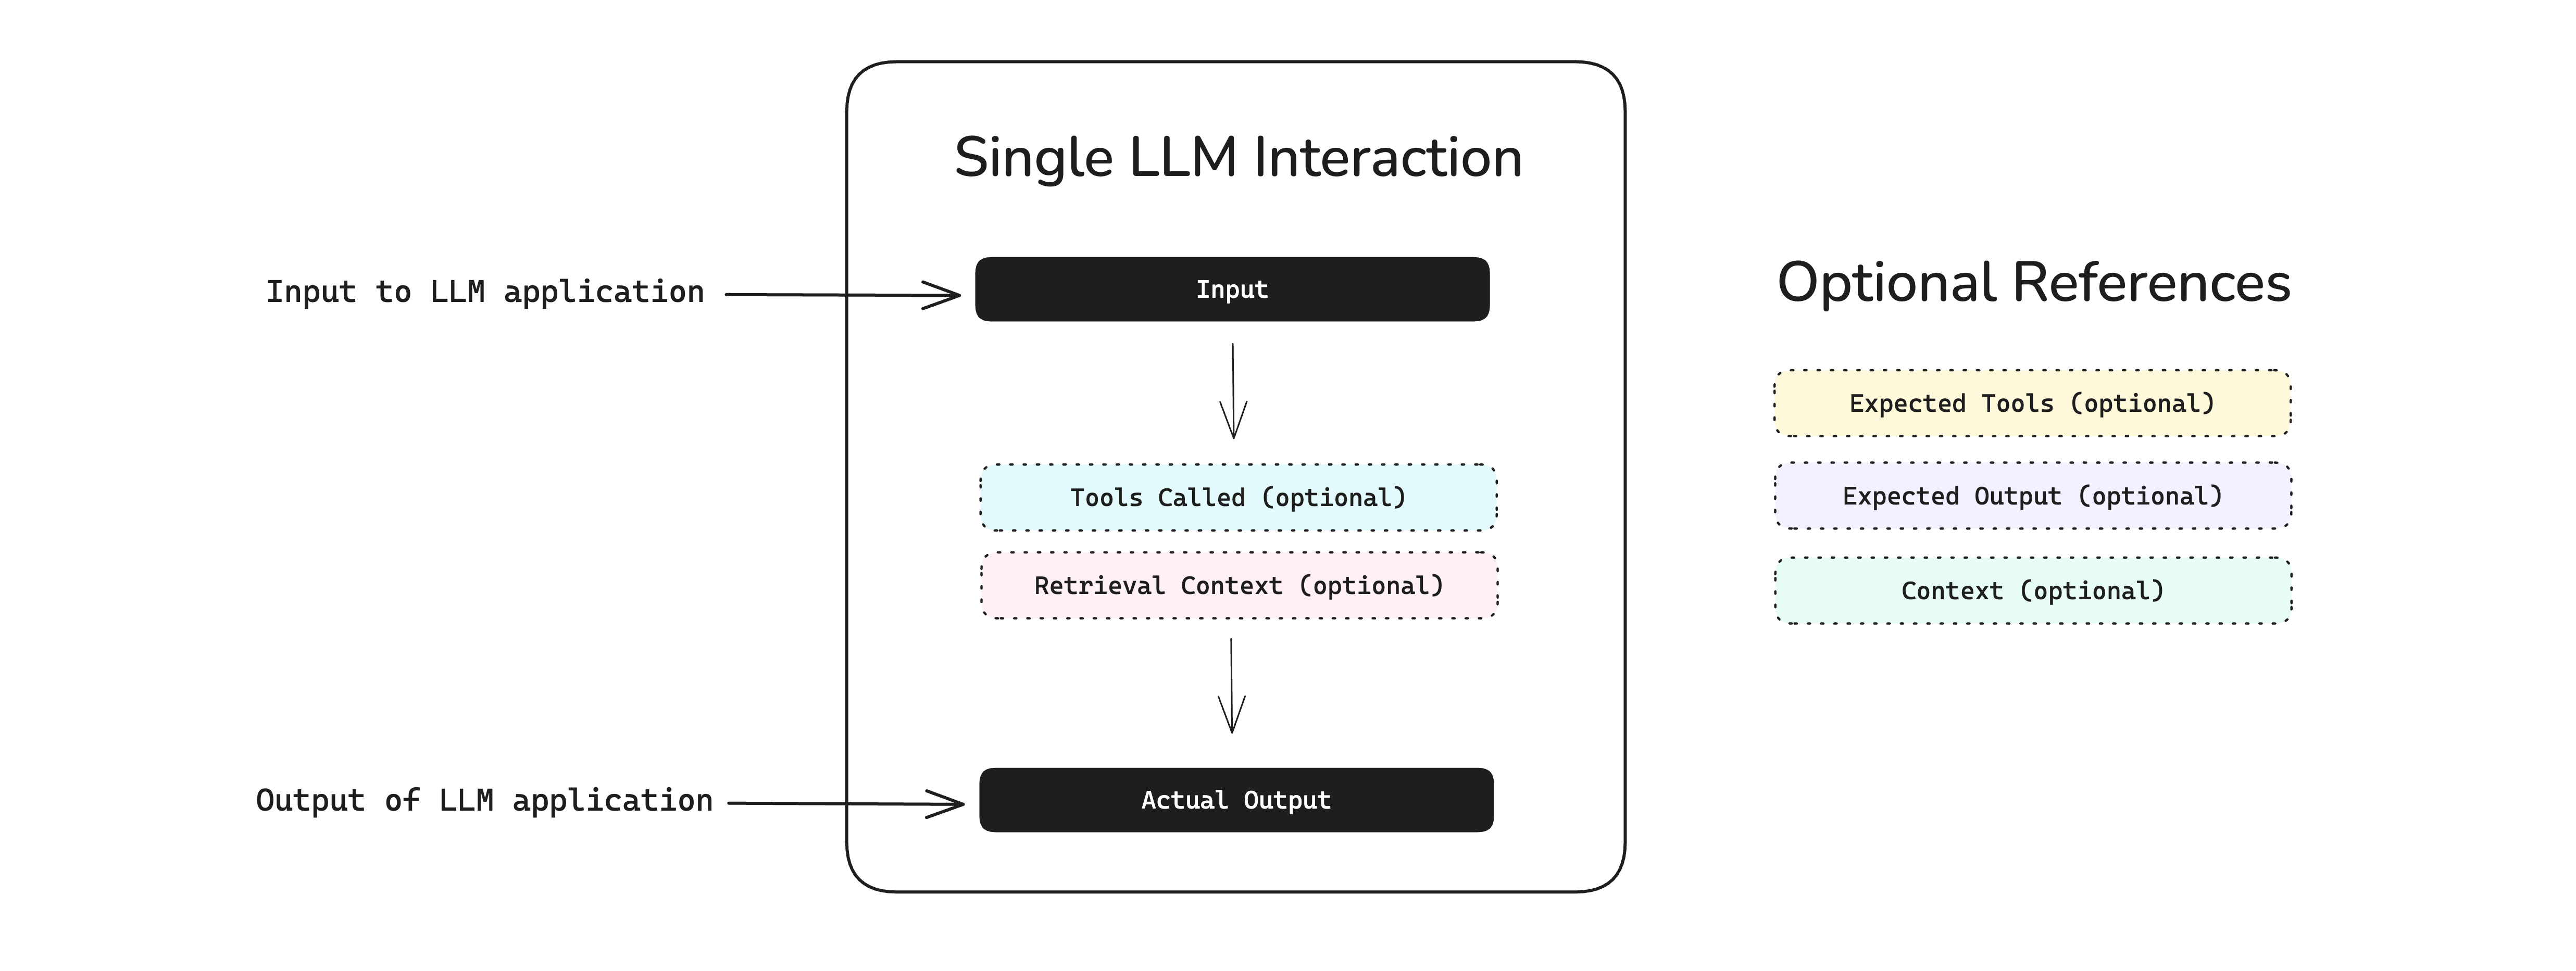
An LLM test case in deepeval represents a single unit of LLM app interaction, and contains mandatory fields such as the input and actual_output (LLM generated output), and optional ones like expected_output.
Run touch test_example.py in your terminal and paste in the following code:
from deepeval import assert_test
from deepeval.test_case import LLMTestCase, SingleTurnParams
from deepeval.metrics import GEval

def test_correctness():
    correctness_metric = GEval(
        name="Correctness",
        criteria="Determine if the 'actual output' is correct based on the 'expected output'.",
        evaluation_params=[SingleTurnParams.ACTUAL_OUTPUT, SingleTurnParams.EXPECTED_OUTPUT],
        threshold=0.5
    )
    test_case = LLMTestCase(
        input="I have a persistent cough and fever. Should I be worried?",
        # Replace this with the actual output from your LLM application
        actual_output="A persistent cough and fever could be a viral infection or something more serious. See a doctor if symptoms worsen or don't improve in a few days.",
        expected_output="A persistent cough and fever could indicate a range of illnesses, from a mild viral infection to more serious conditions like pneumonia or COVID-19. You should seek medical attention if your symptoms worsen, persist for more than a few days, or are accompanied by difficulty breathing, chest pain, or other concerning signs."
    )
    assert_test(test_case, [correctness_metric])
Then, run deepeval test run from the root directory of your project to evaluate your LLM app end-to-end:
deepeval test run test_example.pyCongratulations! Your test case should have passed ✅ Let's breakdown what happened.
- The variable
inputmimics a user input, andactual_outputis a placeholder for what your application's supposed to output based on this input. - The variable
expected_outputrepresents the ideal answer for a giveninput, andGEvalis a research-backed metric provided bydeepevalfor you to evaluate your LLM output's on any custom metric with human-like accuracy. - In this example, the metric
criteriais correctness of theactual_outputbased on the providedexpected_output, but not all metrics require anexpected_output. - All metric scores range from 0 - 1, which the
threshold=0.5threshold ultimately determines if your test have passed or not.
If you run more than one test run, you will be able to catch regressions by comparing test cases side-by-side. This is also made easier if you're using deepeval alongside Confident AI (see below for video demo).
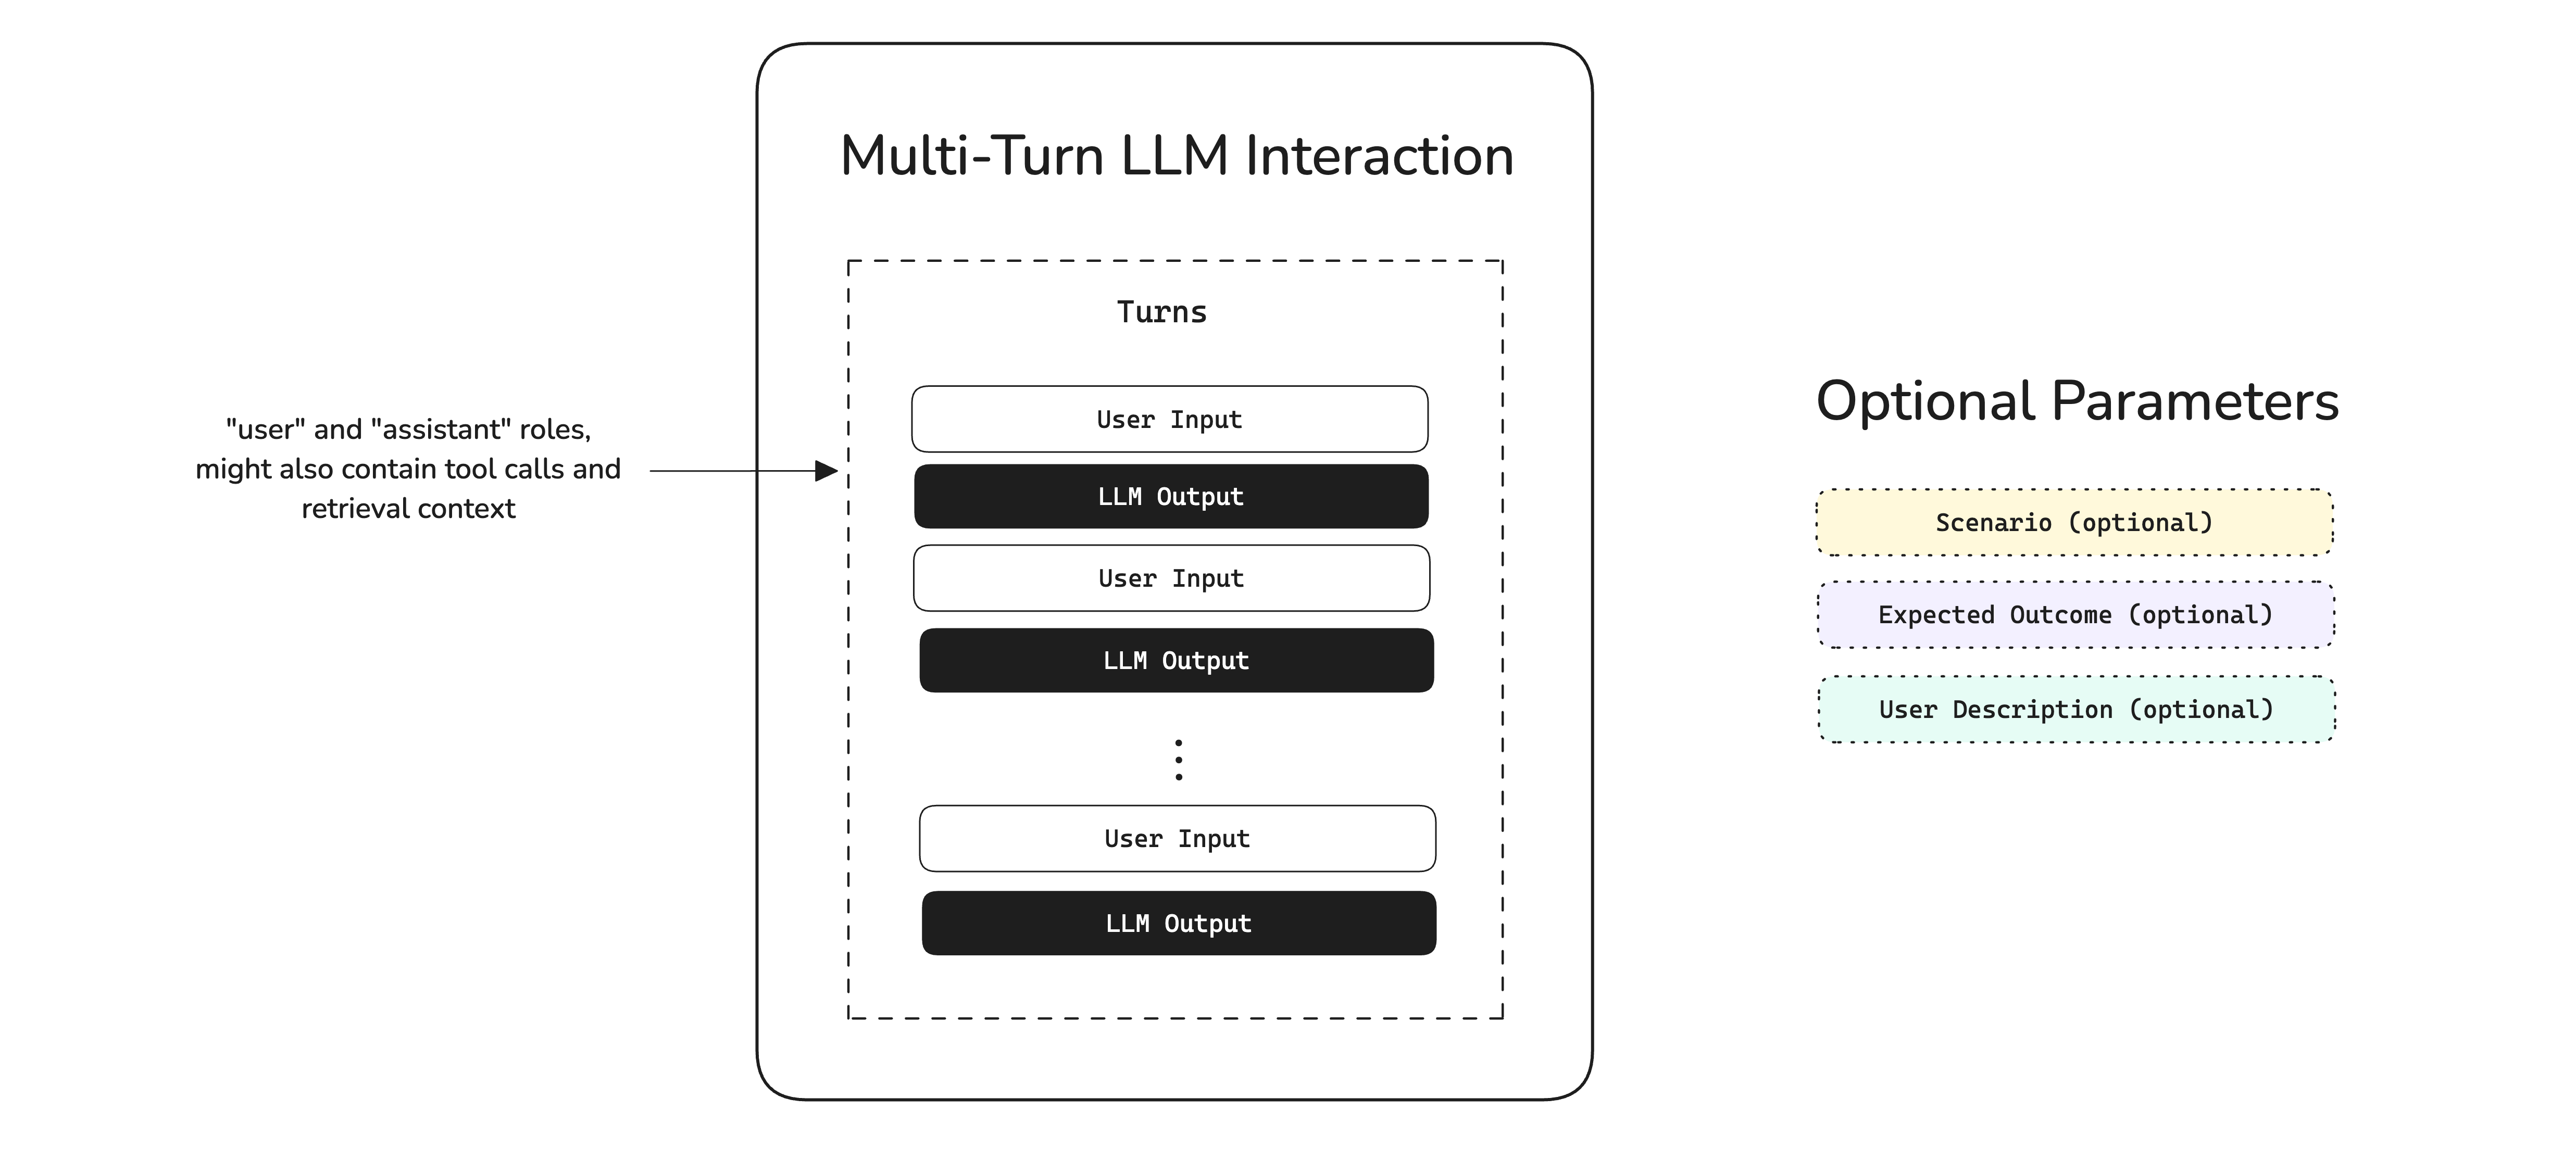
A conversational test case in deepeval represents a multi-turn interaction with your LLM app, and contains information such as the actual conversation that took place in the format of turns, and optionally the scenario of which a conversation happened.
Run touch test_example.py in your terminal and paste in the following code:
from deepeval import assert_test
from deepeval.test_case import Turn, ConversationalTestCase
from deepeval.metrics import ConversationalGEval

def test_professionalism():
    professionalism_metric = ConversationalGEval(
        name="Professionalism",
        criteria="Determine whether the assistant has acted professionally based on the content.",
        threshold=0.5
    )
    test_case = ConversationalTestCase(
        turns=[
            Turn(role="user", content="What is DeepEval?"),
            Turn(role="assistant", content="DeepEval is an open-source LLM eval package.")
        ]
    )
    assert_test(test_case, [professionalism_metric])
Then, run deepeval test run from the root directory of your project to evaluate your LLM app end-to-end:
deepeval test run test_example.py🎉 Congratulations! Your test case should have passed ✅ Let's breakdown what happened.
- The variable
roledistinguishes between the end user and your LLM application, andcontentcontains either the user’s input or the LLM’s output. - In this example, the
criteriametric evaluates the professionalism of the sequence ofcontent. - All metric scores range from 0 - 1, which the
threshold=0.5threshold ultimately determines if your test have passed or not.
If you run more than one test run, you will be able to catch regressions by comparing test cases side-by-side. This is also made easier if you're using deepeval alongside Confident AI (see below for video demo).
Save Results
It is recommended that you push your test runs to Confident AI — an AI quality platform deepeval integrates with natively for observability, evals, and monitoring.
Confident AI is an AI quality platform with observability, evals, and monitoring that deepeval integrates with natively, and helps you build the best LLM evals pipeline. Run deepeval view to view your newly ran test run on the platform:
deepeval viewThe deepeval view command requires that the test run that you ran above has been successfully cached locally. If something errors, simply run a new test run after logging in with deepeval login:
deepeval loginAfter you've logged in, Confident AI will generate testing reports and automate regression testing whenever you run a test run to evaluate your LLM application inside any environment, at any scale, anywhere.
Once you've run more than one test run, you'll be able to use the regression testing page shown near the end of the video. Green rows indicate that your LLM has shown improvement on specific test cases, whereas red rows highlight areas of regression.
Simply set the DEEPEVAL_RESULTS_FOLDER environment variable to your relative path of choice.
# linux
export DEEPEVAL_RESULTS_FOLDER="./data"

# or windows
set DEEPEVAL_RESULTS_FOLDER=.\data
Evals With LLM Tracing
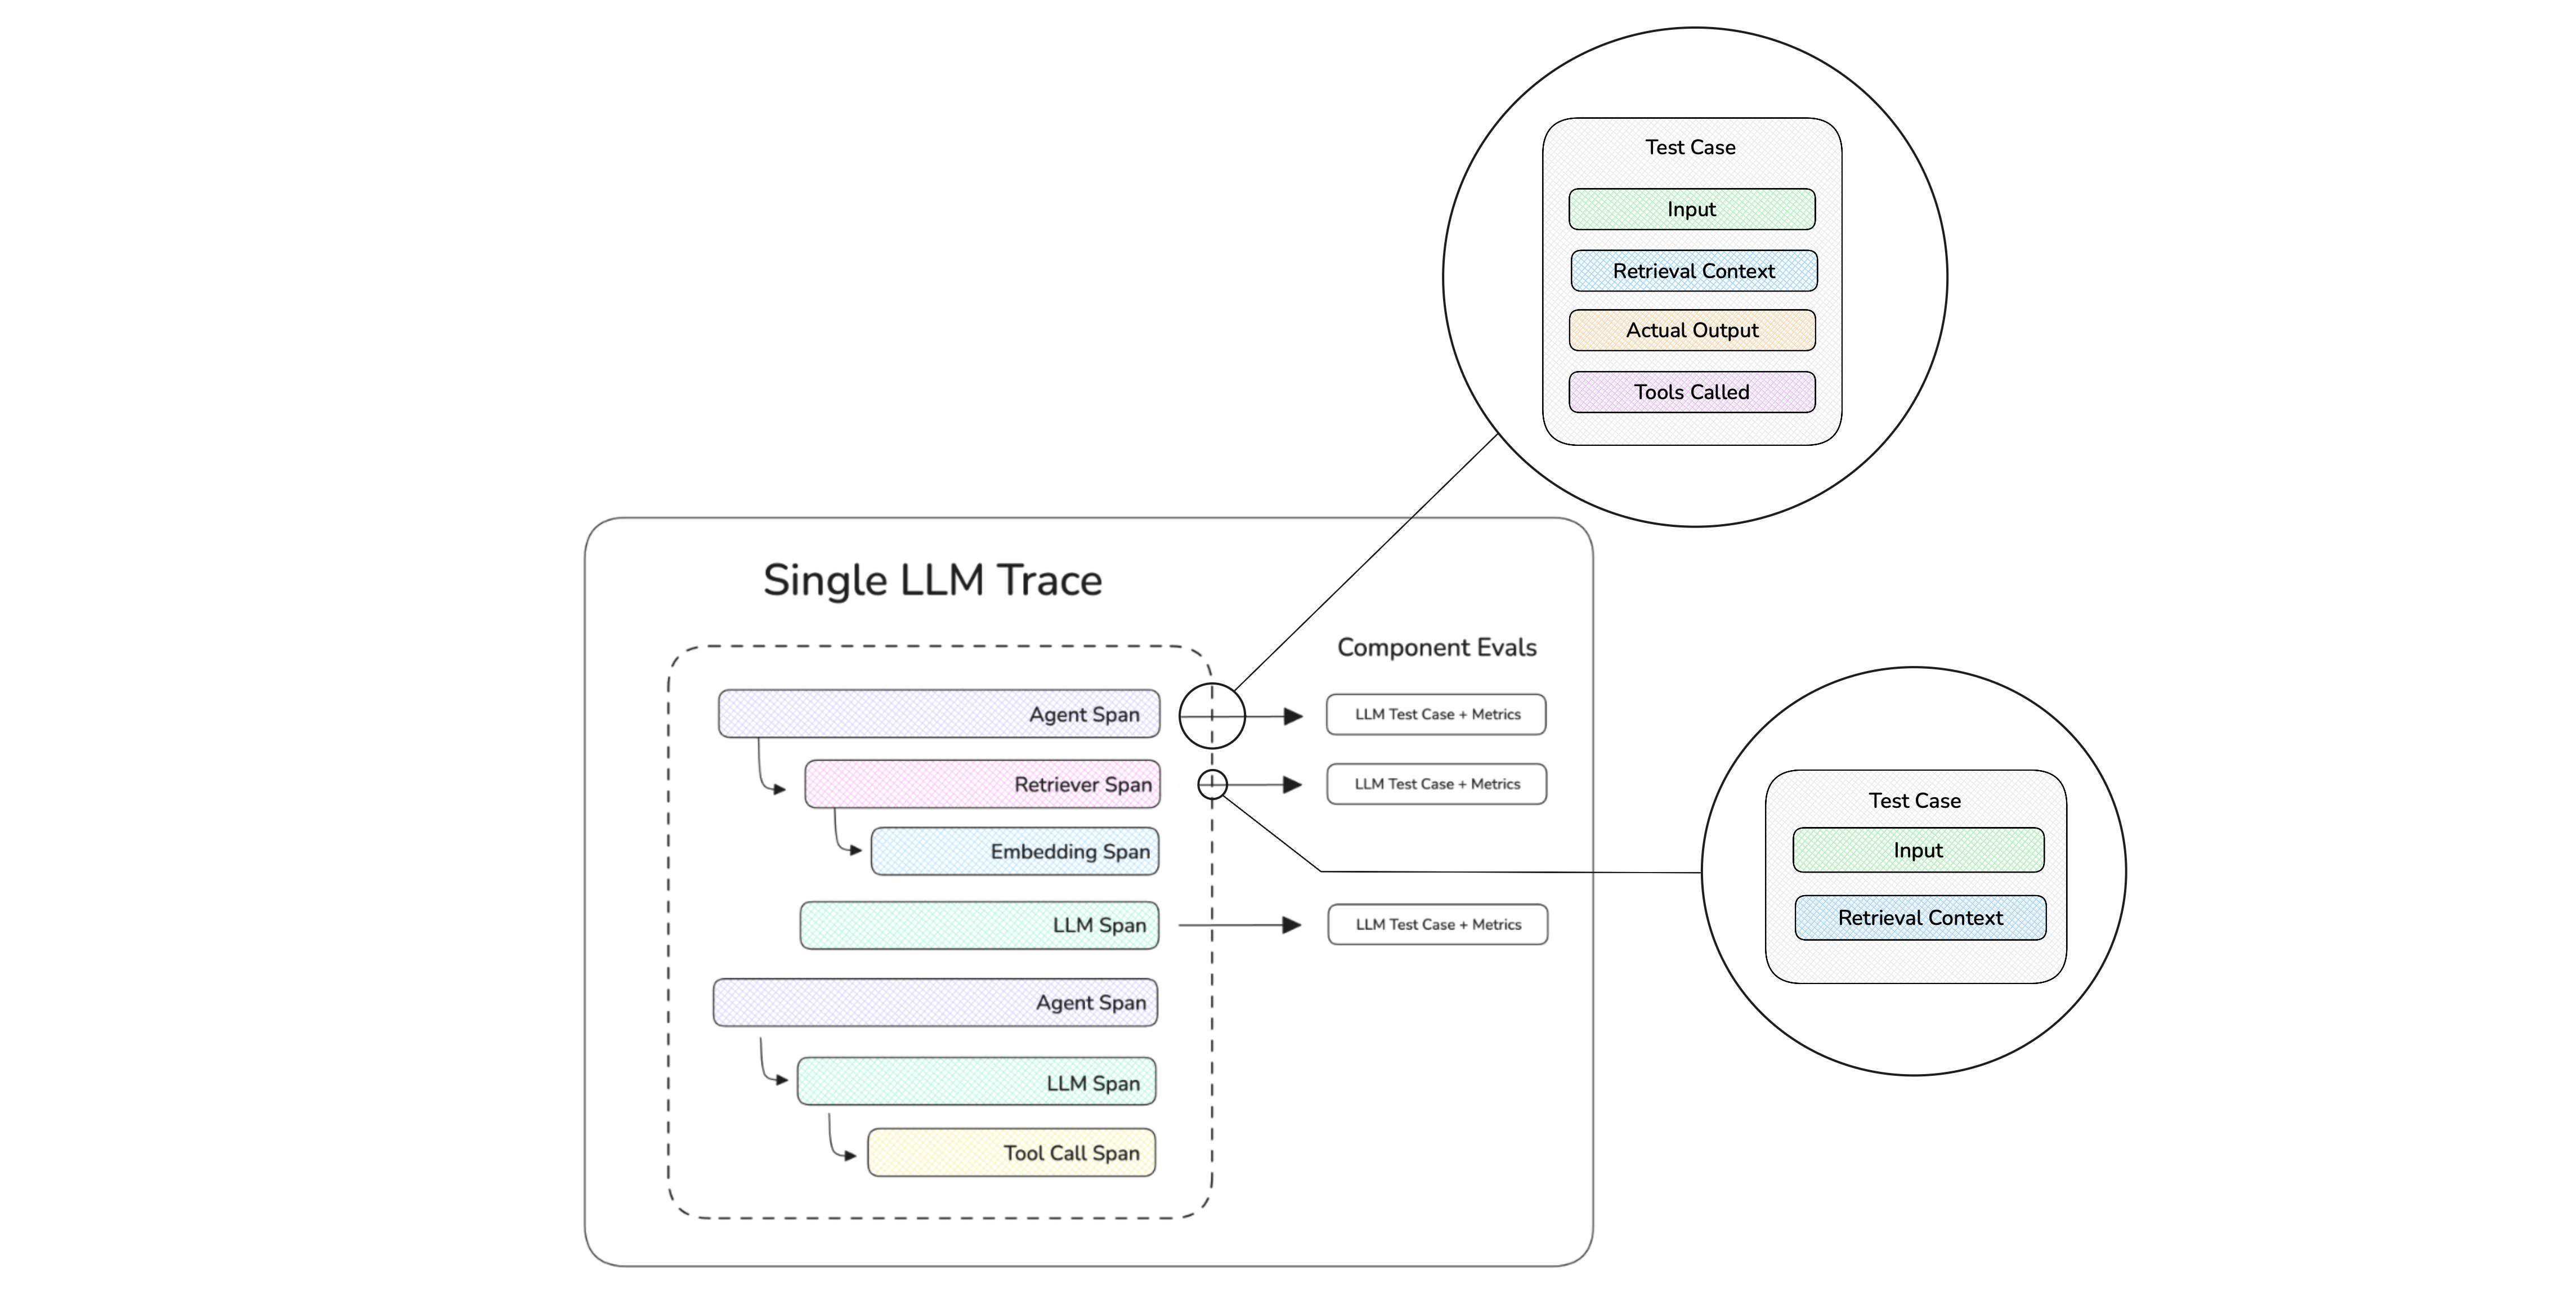
While end-to-end evals treat your LLM app as a black-box, you also evaluate individual components within your LLM app through LLM tracing. This is the recommended way to evaluate AI agents.
First, create a small dataset to evaluate against:
from deepeval.dataset import EvaluationDataset, Golden

dataset = EvaluationDataset(goldens=[Golden(input="Why is the sky blue?")])
Pick your stack below, paste the snippet, and run it. Every integration ships an Async sample (the default — runs goldens concurrently) and a Sync sample (one golden at a time, useful for debugging or rate-limited providers):
Wrap the top-level function with @observe, set trace-level fields with update_current_trace(...), and wrap inner functions you want to grade with @observe too. Attach a component metric by passing metrics=[...] to @observe and registering its test case with update_current_span(test_case=...):
import asyncio
from deepeval.tracing import observe, update_current_span, update_current_trace
from deepeval.test_case import LLMTestCase
from deepeval.metrics import AnswerRelevancyMetric
...

@observe()
async def my_ai_agent(query: str) -> str:
    chunks = await retrieve(query)
    answer = await generate(query, chunks)
    update_current_trace(input=query, output=answer)
    return answer

@observe()
async def retrieve(query: str) -> list[str]:
    return ["..."]

@observe(metrics=[AnswerRelevancyMetric()])
async def generate(query: str, chunks: list[str]) -> str:
    response = "..."  # await your LLM call here with `query` and `chunks`
    update_current_span(
        test_case=LLMTestCase(input=query, actual_output=response, retrieval_context=chunks),
    )
    return response

for golden in dataset.evals_iterator():
    task = asyncio.create_task(my_ai_agent(golden.input))
dataset.evaluate(task)from deepeval.evaluate import AsyncConfig
from deepeval.tracing import observe, update_current_span, update_current_trace
from deepeval.test_case import LLMTestCase
from deepeval.metrics import AnswerRelevancyMetric
...
@observe()
def my_ai_agent(query: str) -> str:
chunks = retrieve(query)
answer = generate(query, chunks)
update_current_trace(input=query, output=answer)
return answer
@observe()
def retrieve(query: str) -> list[str]:
return ["..."]
@observe(metrics=[AnswerRelevancyMetric()])
def generate(query: str, chunks: list[str]) -> str:
response = "..." # call your LLM here with `query` and `chunks`
update_current_span(
test_case=LLMTestCase(input=query, actual_output=response, retrieval_context=chunks),
)
return response
for golden in dataset.evals_iterator(async_config=AsyncConfig(run_async=False)):
my_ai_agent(golden.input)The same pattern works on any @observe'd function — retrievers, tool wrappers, sub-agents. See tracing for the full surface.
Build your agent with create_agent, then pass deepeval's CallbackHandler to its invoke / ainvoke method inside the loop. Stage a component metric for the next LLM call with next_llm_span(...) — the CallbackHandler drains it onto the first LLM span LangChain opens during the agent run:
import asyncio
from langchain.agents import create_agent
from deepeval.tracing import next_llm_span
from deepeval.integrations.langchain import CallbackHandler
from deepeval.metrics import AnswerRelevancyMetric
...

def multiply(a: int, b: int) -> int:
    """Multiply two numbers."""
    return a * b

agent = create_agent(
    model="openai:gpt-4o-mini",
    tools=[multiply],
    system_prompt="Be concise.",
)

async def run_agent(prompt: str):
    with next_llm_span(metrics=[AnswerRelevancyMetric()]):
        return await agent.ainvoke(
            {"messages": [{"role": "user", "content": prompt}]},
            config={"callbacks": [CallbackHandler()]},
        )

for golden in dataset.evals_iterator():
    task = asyncio.create_task(run_agent(golden.input))
dataset.evaluate(task)from langchain.agents import create_agent
from deepeval.tracing import next_llm_span
from deepeval.evaluate import AsyncConfig
from deepeval.integrations.langchain import CallbackHandler
from deepeval.metrics import AnswerRelevancyMetric
...
def multiply(a: int, b: int) -> int:
"""Multiply two numbers."""
return a * b
agent = create_agent(
model="openai:gpt-4o-mini",
tools=[multiply],
system_prompt="Be concise.",
)
for golden in dataset.evals_iterator(async_config=AsyncConfig(run_async=False)):
with next_llm_span(metrics=[AnswerRelevancyMetric()]):
agent.invoke(
{"messages": [{"role": "user", "content": golden.input}]},
config={"callbacks": [CallbackHandler()]},
)next_llm_span is one-shot — only the first LLM span in the agent run picks up the metric, so later turns inside create_agent's loop won't be scored. To score every LLM call, drive the loop yourself (next_llm_span per agent.invoke(...)) or score end-to-end with trace-level metrics on CallbackHandler(metrics=[...]). For retrievers, use next_retriever_span(...) the same way; for deterministic tool calls, prefer next_tool_span(...) + update_current_span(...). See the LangChain integration for the full surface.
Wire your StateGraph, then pass deepeval's CallbackHandler to its invoke / ainvoke method inside the loop. Stage a component metric for the next LLM call with next_llm_span(...) — the CallbackHandler drains it onto the first LLM span LangGraph opens during the graph run:
import asyncio
from langchain.chat_models import init_chat_model
from langgraph.graph import StateGraph, MessagesState, START, END
from deepeval.tracing import next_llm_span
from deepeval.integrations.langchain import CallbackHandler
from deepeval.metrics import AnswerRelevancyMetric
...

llm = init_chat_model("openai:gpt-4o-mini")

async def chatbot(state: MessagesState):
    return {"messages": [await llm.ainvoke(state["messages"])]}

graph = (
    StateGraph(MessagesState)
    .add_node(chatbot)
    .add_edge(START, "chatbot")
    .add_edge("chatbot", END)
    .compile()
)

async def run_graph(prompt: str):
    with next_llm_span(metrics=[AnswerRelevancyMetric()]):
        return await graph.ainvoke(
            {"messages": [{"role": "user", "content": prompt}]},
            config={"callbacks": [CallbackHandler()]},
        )

for golden in dataset.evals_iterator():
    task = asyncio.create_task(run_graph(golden.input))
dataset.evaluate(task)from langchain.chat_models import init_chat_model
from langgraph.graph import StateGraph, MessagesState, START, END
from deepeval.tracing import next_llm_span
from deepeval.evaluate import AsyncConfig
from deepeval.integrations.langchain import CallbackHandler
from deepeval.metrics import AnswerRelevancyMetric
...
llm = init_chat_model("openai:gpt-4o-mini")
def chatbot(state: MessagesState):
return {"messages": [llm.invoke(state["messages"])]}
graph = (
StateGraph(MessagesState)
.add_node(chatbot)
.add_edge(START, "chatbot")
.add_edge("chatbot", END)
.compile()
)
for golden in dataset.evals_iterator(async_config=AsyncConfig(run_async=False)):
with next_llm_span(metrics=[AnswerRelevancyMetric()]):
graph.invoke(
{"messages": [{"role": "user", "content": golden.input}]},
config={"callbacks": [CallbackHandler()]},
)next_llm_span is one-shot — only the first LLM span the graph emits picks up the metric, so later loop turns through the chatbot node won't be scored. To score every LLM call, drive the loop yourself (next_llm_span per graph.invoke(...)) or score end-to-end with trace-level metrics on CallbackHandler(metrics=[...]). See the LangGraph integration for the full surface.
Drop-in replace from openai import OpenAI with from deepeval.openai import OpenAI (or AsyncOpenAI). Every chat.completions.create(...), chat.completions.parse(...), and responses.create(...) call becomes an LLM span. Wrap a call in with trace(llm_span_context=LlmSpanContext(metrics=[...])): to stage a component metric for it:
import asyncio
from deepeval.openai import AsyncOpenAI
from deepeval.tracing import trace, LlmSpanContext
from deepeval.metrics import AnswerRelevancyMetric
...

client = AsyncOpenAI()

async def call_openai(prompt: str):
    with trace(llm_span_context=LlmSpanContext(metrics=[AnswerRelevancyMetric()])):
        return await client.chat.completions.create(
            model="gpt-4o",
            messages=[{"role": "user", "content": prompt}],
        )

for golden in dataset.evals_iterator():
    task = asyncio.create_task(call_openai(golden.input))
dataset.evaluate(task)from deepeval.openai import OpenAI
from deepeval.tracing import trace, LlmSpanContext
from deepeval.evaluate import AsyncConfig
from deepeval.metrics import AnswerRelevancyMetric
...
client = OpenAI()
for golden in dataset.evals_iterator(async_config=AsyncConfig(run_async=False)):
with trace(llm_span_context=LlmSpanContext(metrics=[AnswerRelevancyMetric()])):
client.chat.completions.create(
model="gpt-4o",
messages=[{"role": "user", "content": golden.input}],
)See the OpenAI integration for streaming and tool-calling.
Pass DeepEvalInstrumentationSettings() to your Agent's instrument keyword. Stage a component metric for the next Pydantic-emitted span with next_llm_span(...) (LLM call) or next_agent_span(...) (agent span):
import asyncio
from pydantic_ai import Agent
from deepeval.tracing import next_llm_span
from deepeval.integrations.pydantic_ai import DeepEvalInstrumentationSettings
from deepeval.metrics import AnswerRelevancyMetric
...

agent = Agent(
    "openai:gpt-4.1",
    system_prompt="Be concise.",
    instrument=DeepEvalInstrumentationSettings(),
)

async def run_agent(prompt: str):
    with next_llm_span(metrics=[AnswerRelevancyMetric()]):
        return await agent.run(prompt)

for golden in dataset.evals_iterator():
    task = asyncio.create_task(run_agent(golden.input))
dataset.evaluate(task)from pydantic_ai import Agent
from deepeval.tracing import next_llm_span
from deepeval.evaluate import AsyncConfig
from deepeval.integrations.pydantic_ai import DeepEvalInstrumentationSettings
from deepeval.metrics import AnswerRelevancyMetric
...
agent = Agent(
"openai:gpt-4.1",
system_prompt="Be concise.",
instrument=DeepEvalInstrumentationSettings(),
)
for golden in dataset.evals_iterator(async_config=AsyncConfig(run_async=False)):
with next_llm_span(metrics=[AnswerRelevancyMetric()]):
agent.run_sync(golden.input)See the Pydantic AI integration for the full surface.
Call instrument_agentcore() before creating your agent. The same call also instruments Strands agents running inside AgentCore. Stage a component metric for the next AgentCore-emitted span with next_agent_span(...) or next_llm_span(...):
import asyncio
from strands import Agent
from deepeval.tracing import next_agent_span
from deepeval.integrations.agentcore import instrument_agentcore
from deepeval.metrics import TaskCompletionMetric
...

instrument_agentcore()

agent = Agent(model="amazon.nova-lite-v1:0")

async def run_agent(prompt: str):
    with next_agent_span(metrics=[TaskCompletionMetric()]):
        return await agent.invoke_async(prompt)

for golden in dataset.evals_iterator():
    task = asyncio.create_task(run_agent(golden.input))
dataset.evaluate(task)from strands import Agent
from deepeval.tracing import next_agent_span
from deepeval.evaluate import AsyncConfig
from deepeval.integrations.agentcore import instrument_agentcore
from deepeval.metrics import TaskCompletionMetric
...
instrument_agentcore()
agent = Agent(model="amazon.nova-lite-v1:0")
for golden in dataset.evals_iterator(async_config=AsyncConfig(run_async=False)):
with next_agent_span(metrics=[TaskCompletionMetric()]):
agent(golden.input)See the AgentCore integration for the full surface (including the BedrockAgentCoreApp entrypoint pattern).
Call instrument_strands() before invoking your Strands agent (for AgentCore-hosted Strands, use the AgentCore tab instead). Stage a component metric for the next Strands-emitted span with next_agent_span(...) or next_llm_span(...):
import asyncio
from strands import Agent
from strands.models.openai import OpenAIModel
from deepeval.tracing import next_agent_span
from deepeval.integrations.strands import instrument_strands
from deepeval.metrics import TaskCompletionMetric
...

instrument_strands()

agent = Agent(
    model=OpenAIModel(model_id="gpt-4o-mini"),
    system_prompt="You are a helpful assistant.",
)

async def run_agent(prompt: str):
    with next_agent_span(metrics=[TaskCompletionMetric()]):
        return await agent.invoke_async(prompt)

for golden in dataset.evals_iterator():
    task = asyncio.create_task(run_agent(golden.input))
dataset.evaluate(task)from strands import Agent
from strands.models.openai import OpenAIModel
from deepeval.tracing import next_agent_span
from deepeval.evaluate import AsyncConfig
from deepeval.integrations.strands import instrument_strands
from deepeval.metrics import TaskCompletionMetric
...
instrument_strands()
agent = Agent(
model=OpenAIModel(model_id="gpt-4o-mini"),
system_prompt="You are a helpful assistant.",
)
for golden in dataset.evals_iterator(async_config=AsyncConfig(run_async=False)):
with next_agent_span(metrics=[TaskCompletionMetric()]):
agent(golden.input)See the Strands integration for the full surface.
Drop-in replace from anthropic import Anthropic with from deepeval.anthropic import Anthropic (or AsyncAnthropic). Wrap a call in with trace(llm_span_context=LlmSpanContext(metrics=[...])): to stage a component metric for its LLM span:
import asyncio
from deepeval.anthropic import AsyncAnthropic
from deepeval.tracing import trace, LlmSpanContext
from deepeval.metrics import AnswerRelevancyMetric
...

client = AsyncAnthropic()

async def call_claude(prompt: str):
    with trace(llm_span_context=LlmSpanContext(metrics=[AnswerRelevancyMetric()])):
        return await client.messages.create(
            model="claude-sonnet-4-5",
            max_tokens=1024,
            messages=[{"role": "user", "content": prompt}],
        )

for golden in dataset.evals_iterator():
    task = asyncio.create_task(call_claude(golden.input))
dataset.evaluate(task)from deepeval.anthropic import Anthropic
from deepeval.tracing import trace, LlmSpanContext
from deepeval.evaluate import AsyncConfig
from deepeval.metrics import AnswerRelevancyMetric
...
client = Anthropic()
for golden in dataset.evals_iterator(async_config=AsyncConfig(run_async=False)):
with trace(llm_span_context=LlmSpanContext(metrics=[AnswerRelevancyMetric()])):
client.messages.create(
model="claude-sonnet-4-5",
max_tokens=1024,
messages=[{"role": "user", "content": golden.input}],
)See the Anthropic integration for streaming and tool-use.
Register deepeval's event handler against LlamaIndex's instrumentation dispatcher. Stage a component metric for the agent span with AgentSpanContext (or the next LLM span with LlmSpanContext) inside with trace(...). agent.run(...) is async-only, so the sync variant uses asyncio.run(...):
import asyncio
from llama_index.llms.openai import OpenAI
from llama_index.core.agent import FunctionAgent
import llama_index.core.instrumentation as instrument
from deepeval.tracing import trace, AgentSpanContext
from deepeval.integrations.llama_index import instrument_llama_index
from deepeval.metrics import TaskCompletionMetric
...

instrument_llama_index(instrument.get_dispatcher())

def multiply(a: float, b: float) -> float:
    return a * b

agent = FunctionAgent(
    tools=[multiply],
    llm=OpenAI(model="gpt-4o-mini"),
    system_prompt="You are a helpful calculator.",
)

async def run_agent(prompt: str):
    with trace(agent_span_context=AgentSpanContext(metrics=[TaskCompletionMetric()])):
        return await agent.run(prompt)

for golden in dataset.evals_iterator():
    task = asyncio.create_task(run_agent(golden.input))
dataset.evaluate(task)import asyncio
from llama_index.llms.openai import OpenAI
from llama_index.core.agent import FunctionAgent
import llama_index.core.instrumentation as instrument
from deepeval.tracing import trace, AgentSpanContext
from deepeval.evaluate import AsyncConfig
from deepeval.integrations.llama_index import instrument_llama_index
from deepeval.metrics import TaskCompletionMetric
...
instrument_llama_index(instrument.get_dispatcher())
def multiply(a: float, b: float) -> float:
return a * b
agent = FunctionAgent(
tools=[multiply],
llm=OpenAI(model="gpt-4o-mini"),
system_prompt="You are a helpful calculator.",
)
async def run_agent(prompt: str):
with trace(agent_span_context=AgentSpanContext(metrics=[TaskCompletionMetric()])):
return await agent.run(prompt)
for golden in dataset.evals_iterator(async_config=AsyncConfig(run_async=False)):
asyncio.run(run_agent(golden.input))See the LlamaIndex integration for the full surface.
Register DeepEvalTracingProcessor once, then build your agent with deepeval's Agent and function_tool shims. Attach component metrics directly on the Agent (agent_metrics for the agent span, llm_metrics for the LLM span) and on @function_tool (for the tool span):
import asyncio
from agents import Runner, add_trace_processor
from deepeval.openai_agents import Agent, DeepEvalTracingProcessor, function_tool
from deepeval.metrics import TaskCompletionMetric, AnswerRelevancyMetric, GEval
from deepeval.test_case import LLMTestCaseParams
...

add_trace_processor(DeepEvalTracingProcessor())

@function_tool(metrics=[GEval(
    name="Helpful Weather Lookup",
    criteria="Output must be a clear weather summary for the requested city.",
    evaluation_params=[LLMTestCaseParams.INPUT, LLMTestCaseParams.ACTUAL_OUTPUT],
)])
def get_weather(city: str) -> str:
    return f"It's always sunny in {city}!"

agent = Agent(
    name="weather_agent",
    instructions="Answer weather questions concisely.",
    tools=[get_weather],
    agent_metrics=[TaskCompletionMetric()],
    llm_metrics=[AnswerRelevancyMetric()],
)

for golden in dataset.evals_iterator():
    task = asyncio.create_task(Runner.run(agent, golden.input))
dataset.evaluate(task)from agents import Runner, add_trace_processor
from deepeval.evaluate import AsyncConfig
from deepeval.openai_agents import Agent, DeepEvalTracingProcessor, function_tool
from deepeval.metrics import TaskCompletionMetric, AnswerRelevancyMetric, GEval
from deepeval.test_case import LLMTestCaseParams
...
add_trace_processor(DeepEvalTracingProcessor())
@function_tool(metrics=[GEval(
name="Helpful Weather Lookup",
criteria="Output must be a clear weather summary for the requested city.",
evaluation_params=[LLMTestCaseParams.INPUT, LLMTestCaseParams.ACTUAL_OUTPUT],
)])
def get_weather(city: str) -> str:
return f"It's always sunny in {city}!"
agent = Agent(
name="weather_agent",
instructions="Answer weather questions concisely.",
tools=[get_weather],
agent_metrics=[TaskCompletionMetric()],
llm_metrics=[AnswerRelevancyMetric()],
)
for golden in dataset.evals_iterator(async_config=AsyncConfig(run_async=False)):
Runner.run_sync(agent, golden.input)agent_metrics apply on every run (including handoffs to sub-agents). See the OpenAI Agents integration for the full surface.
Call instrument_google_adk() once before building your LlmAgent. Stage a component metric for the next Google-ADK-emitted span with next_agent_span(...) or next_llm_span(...). ADK's runner.run_async(...) is async-only, so the sync variant uses asyncio.run(...):
import asyncio
from google.adk.agents import LlmAgent
from google.adk.runners import InMemoryRunner
from google.genai import types
from deepeval.tracing import next_agent_span
from deepeval.integrations.google_adk import instrument_google_adk
from deepeval.metrics import TaskCompletionMetric
...

instrument_google_adk()

agent = LlmAgent(model="gemini-2.0-flash", name="assistant", instruction="Be concise.")
runner = InMemoryRunner(agent=agent, app_name="deepeval-quickstart")

async def run_agent(prompt: str) -> str:
    session = await runner.session_service.create_session(
        app_name="deepeval-quickstart", user_id="demo-user",
    )
    message = types.Content(role="user", parts=[types.Part(text=prompt)])
    async for event in runner.run_async(
        user_id="demo-user", session_id=session.id, new_message=message,
    ):
        if event.is_final_response() and event.content:
            return "".join(part.text for part in event.content.parts if getattr(part, "text", None))
    return ""

async def run_with_metric(prompt: str) -> str:
    with next_agent_span(metrics=[TaskCompletionMetric()]):
        return await run_agent(prompt)

for golden in dataset.evals_iterator():
    task = asyncio.create_task(run_with_metric(golden.input))
dataset.evaluate(task)import asyncio
from google.adk.agents import LlmAgent
from google.adk.runners import InMemoryRunner
from google.genai import types
from deepeval.tracing import next_agent_span
from deepeval.evaluate import AsyncConfig
from deepeval.integrations.google_adk import instrument_google_adk
from deepeval.metrics import TaskCompletionMetric
...
instrument_google_adk()
agent = LlmAgent(model="gemini-2.0-flash", name="assistant", instruction="Be concise.")
runner = InMemoryRunner(agent=agent, app_name="deepeval-quickstart")
async def run_agent(prompt: str) -> str:
session = await runner.session_service.create_session(
app_name="deepeval-quickstart", user_id="demo-user",
)
message = types.Content(role="user", parts=[types.Part(text=prompt)])
async for event in runner.run_async(
user_id="demo-user", session_id=session.id, new_message=message,
):
if event.is_final_response() and event.content:
return "".join(part.text for part in event.content.parts if getattr(part, "text", None))
return ""
for golden in dataset.evals_iterator(async_config=AsyncConfig(run_async=False)):
with next_agent_span(metrics=[TaskCompletionMetric()]):
asyncio.run(run_agent(golden.input))See the Google ADK integration for the full surface.
Call instrument_crewai() once, then build your crew with deepeval's Crew, Agent, LLM, and @tool shims. Attach component metrics directly on Agent (agent span), LLM (LLM span), or @tool (tool span):
import asyncio
from crewai import Task
from deepeval.integrations.crewai import instrument_crewai, Crew, Agent
from deepeval.metrics import TaskCompletionMetric
...

instrument_crewai()

tutor = Agent(
    role="Math Tutor",
    goal="Answer math questions accurately and concisely.",
    backstory="An experienced tutor who explains simple math clearly.",
    metrics=[TaskCompletionMetric()],
)
answer_task = Task(
    description="{question}",
    expected_output="An accurate, concise answer.",
    agent=tutor,
)
crew = Crew(agents=[tutor], tasks=[answer_task])

for golden in dataset.evals_iterator():
    task = asyncio.create_task(crew.kickoff_async({"question": golden.input}))
dataset.evaluate(task)from crewai import Task
from deepeval.evaluate import AsyncConfig
from deepeval.integrations.crewai import instrument_crewai, Crew, Agent
from deepeval.metrics import TaskCompletionMetric
...
instrument_crewai()
tutor = Agent(
role="Math Tutor",
goal="Answer math questions accurately and concisely.",
backstory="An experienced tutor who explains simple math clearly.",
metrics=[TaskCompletionMetric()],
)
task = Task(
description="{question}",
expected_output="An accurate, concise answer.",
agent=tutor,
)
crew = Crew(agents=[tutor], tasks=[task])
for golden in dataset.evals_iterator(async_config=AsyncConfig(run_async=False)):
crew.kickoff({"question": golden.input})See the CrewAI integration for the full surface (including LLM and @tool metric attachment).
Then run the file (python main.py, python langchain_app.py, etc.):
python main.py🎉 Congratulations! Your eval should have run ✅ A quick recap of what happened:
evals_iterator()looped through your dataset, capturing one trace per golden.- Your integration's adapter (or
@observe) created spans for the components inside the trace. - The
metrics=[...]you attached to one of those spans scored it once the trace finished. - DeepEval aggregated everything into one test run.
For sub-agents, retriever scoring, span context customization, and more, see component-level evaluation.
DeepEval for Online Evals
When you do LLM tracing using deepeval, you can automatically run online evals to monitor traces, spans, and threads (conversations) in production.
You'll need to use Confident AI to provide the necessary backend infrastructure and dashboard for this.
Simply get an API key from Confident AI and set it in the CLI:
CONFIDENT_API_KEY="confident_us..."Then add a "metric collection" to your trace:
from deepeval.tracing import observe, update_current_trace

@observe()
def ai_agent(input: str) -> str:
    output = "Your AI agent output"
    update_current_trace(metric_collection="My Online Evals",)
    return output
✅ Done. All invocations of your AI agent will now have online evals ran on it.
deepeval's LLM tracing implementation is non-instrusive, meaning it will not affect any part of your code.
Evals on traces are end-to-end evaluations, where a single LLM interaction is being evaluated.
Spans make up a trace and evals on spans represents component-level evaluations, where individual components in your LLM app are being evaluated.
Threads are made up of one or more traces, and represents a multi-turn interaction to be evaluated.
Next Steps
-
Learn the core concepts if you want to build a repeatable eval suite:
-
Follow a use-case quickstart if you want a path tailored to your system:
-
Explore other workflows when you're ready to go beyond a single eval:
- Generate synthetic data
- Simulate conversations
- Use integrations with LangChain, LangGraph, OpenAI, CrewAI, and more
If your team needs shared reports, regression analysis, or production monitoring, DeepEval integrates natively with Confident AI.
FAQs
Why did my eval get stuck?
Do I need Confident AI for this quickstart?
Where should I put this test file?
tests/ folder. Then run deepeval test run path/to/test_file.py.Can I use a model other than OpenAI?
What should I read after this?
Full Example
You can find the full example here on our Github.