Single-Turn Test Case
Quick Summary
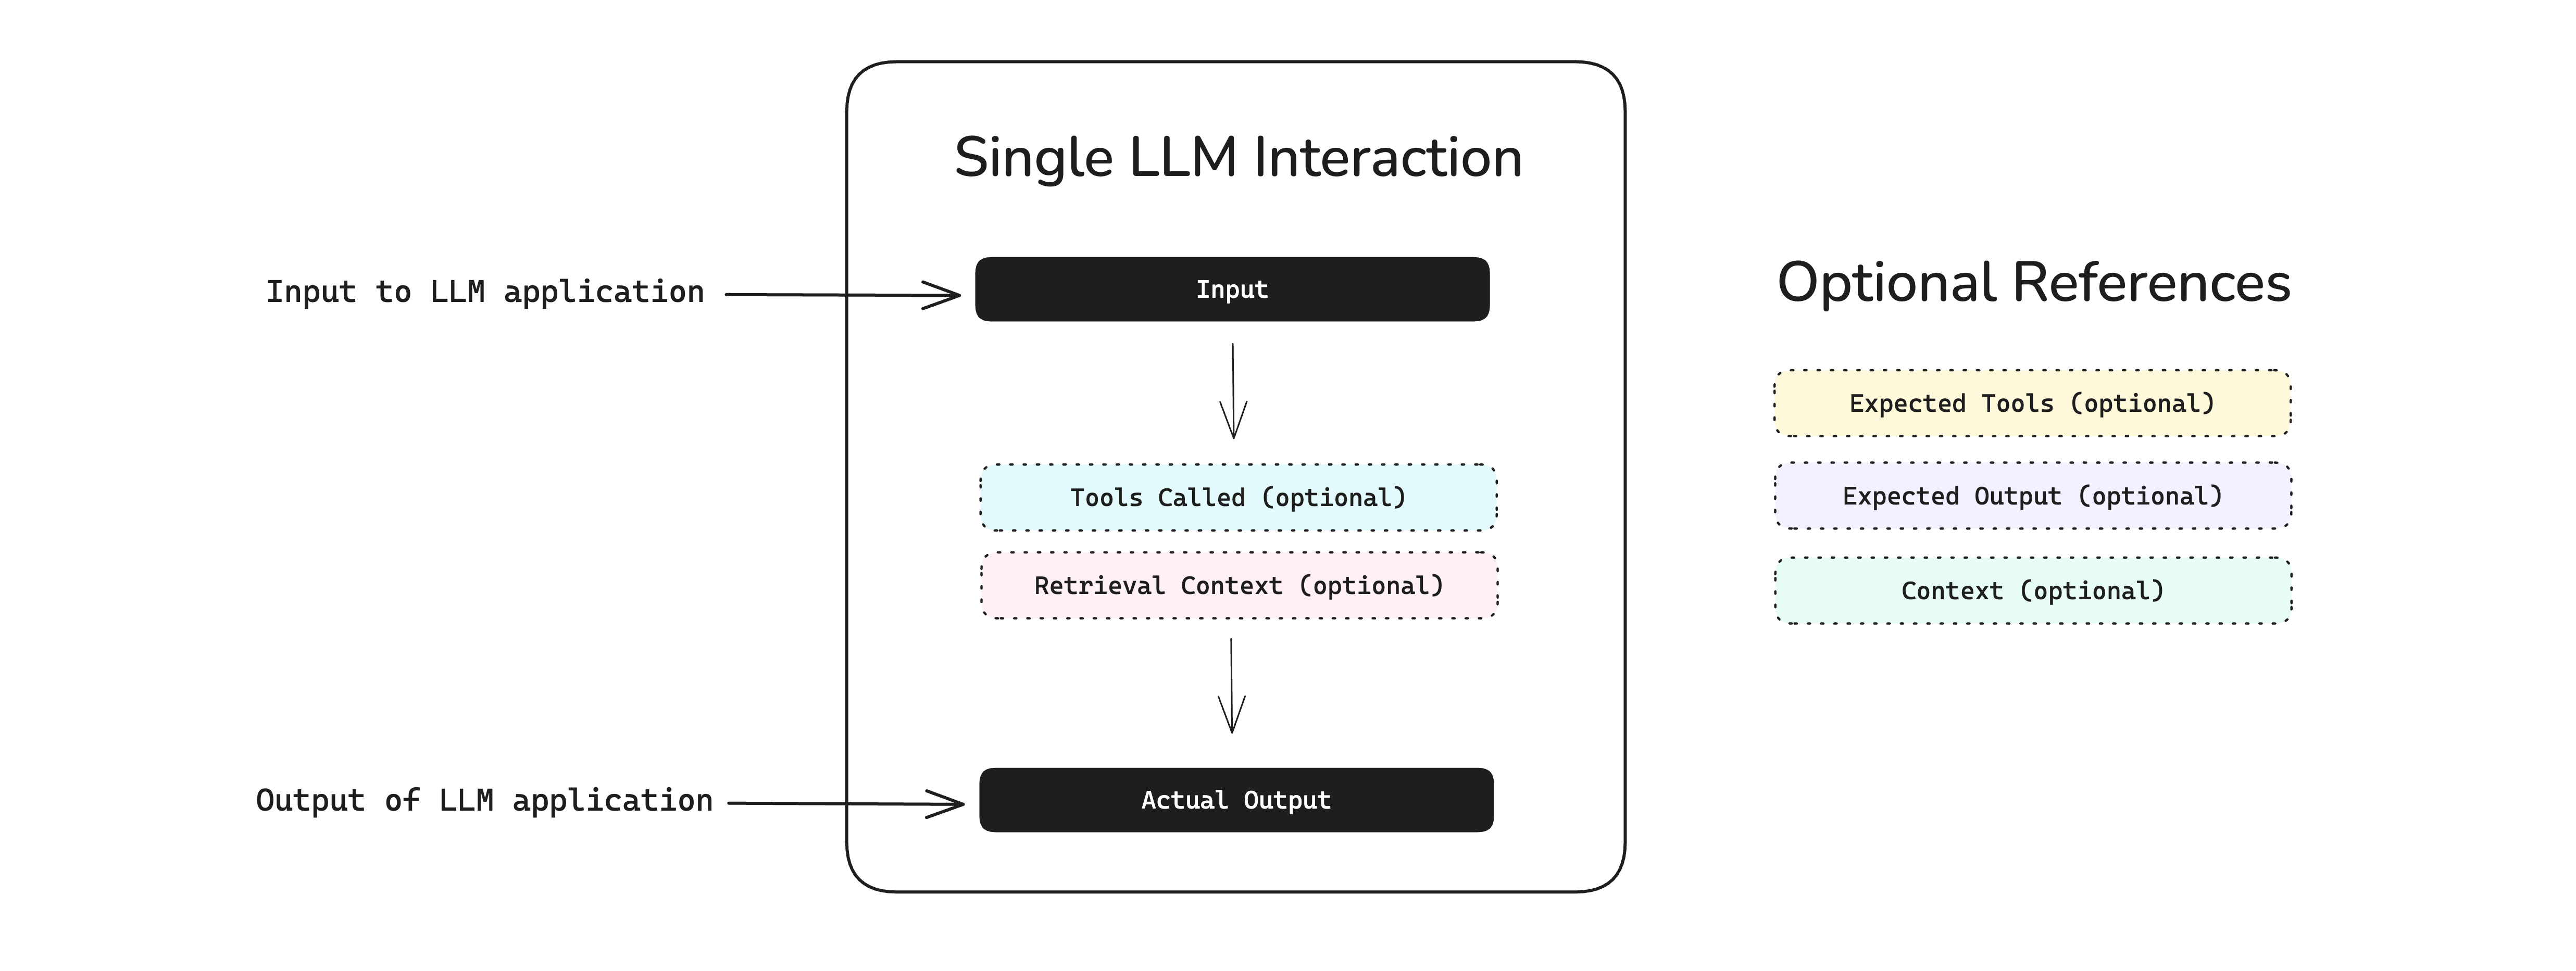
A single-turn test case is a blueprint provided by deepeval to unit test LLM outputs, and represents a single, atomic unit of interaction with your LLM app.
An LLMTestCase is the most prominent type of test case in deepeval. It has NINE parameters:
input- [Optional]
actual_output - [Optional]
expected_output - [Optional]
context - [Optional]
retrieval_context - [Optional]
tools_called - [Optional]
expected_tools - [Optional]
token_cost - [Optional]
completion_time
Here's an example implementation of an LLMTestCase:
from deepeval.test_case import LLMTestCase, ToolCall

test_case = LLMTestCase(
    input="What if these shoes don't fit?",
    expected_output="You're eligible for a 30 day refund at no extra cost.",
    actual_output="We offer a 30-day full refund at no extra cost.",
    context=["All customers are eligible for a 30 day full refund at no extra cost."],
    retrieval_context=["Only shoes can be refunded."],
    tools_called=[ToolCall(name="WebSearch")]
)What Is An LLM "Interaction"?
An LLM interaction is any discrete exchange of information between components of your LLM system — from a full user request to a single internal step. The scope of interaction is arbitrary and is entirely up to you.
Let’s take this LLM system as an example:
There are different ways you scope an interaction:
-
Agent-Level: The entire process initiated by the agent, including the RAG pipeline and web search tool usage
-
RAG Pipeline: Just the RAG flow — retriever + LLM
- Retriever: Only test whether relevant documents are being retrieved
- LLM: Focus purely on how well the LLM generates text from the input/context
An interaction is where you want to define your LLMTestCase. For example, when using RAG-specific metrics like AnswerRelevancyMetric, FaithfulnessMetric, or ContextualRelevancyMetric, the interaction is best scoped at the RAG pipeline level.
In this case:
-
inputshould be the user question or text to embed -
retrieval_contextshould be the retrieved documents from the retriever -
actual_outputshould be the final response generated by the LLM
If you would want to evaluate using the ToolCorrectnessMetric however, you'll need to create an LLMTestCase at the Agent-Level, and supply the tools_called parameter instead:
We'll go through the requirements for an LLMTestCase before showing how to create an LLMTestCase for an interaction.
LLM Test Case
An LLMTestCase in deepeval can be used to unit test interactions within your LLM application (which can just be an LLM itself), which includes use cases such as RAG and LLM agents (for individual components, agents within agents, or the agent altogether). It contains the necessary information (tools_called for agents, retrieval_context for RAG, etc.) to evaluate your LLM application for a given input.
An LLMTestCase is used for both end-to-end and component-level evaluation:
-
End-to-end: An
LLMTestCaserepresents the inputs and outputs of your "black-box" LLM application -
Component-level: Many
LLMTestCases represents many interactions in different components
Different metrics will require a different combination of LLMTestCase parameters, but they all require an input and actual_output - regardless of whether they are used for evaluation or not. For example, you won't need expected_output, context, tools_called, and expected_tools if you're just measuring answer relevancy, but if you're evaluating hallucination you'll have to provide context in order for deepeval to know what the ground truth is.
With the exception of conversational metrics, which are metrics to evaluate conversations instead of individual LLM responses, you can use any LLM evaluation metric deepeval offers to evaluate an LLMTestCase.
Keep reading to learn which parameters in an LLMTestCase are required to evaluate different aspects of an LLM applications - ranging from pure LLMs, RAG pipelines, and even LLM agents.
Input
The input mimics a user interacting with your LLM application. The input can contain just text or text with images as well, it is the direct input to your prompt template, and so SHOULD NOT CONTAIN your prompt template.
from deepeval.test_case import LLMTestCase

test_case = LLMTestCase(
    input="Why did the chicken cross the road?",
    # Replace this with your actual LLM application
    actual_output="Quite frankly, I don't want to know..."
)Actual Output
The actual_output is an optional parameter and represents what your LLM app outputs for a given input. Typically, you would import your LLM application (or parts of it) into your test file, and invoke it at runtime to get the actual output. The actual_output can be text or image or both as well depending on what your LLM application outputs.
# A hypothetical LLM application example
import chatbot

input = "Why did the chicken cross the road?"

test_case = LLMTestCase(
    input=input,
    actual_output=chatbot.run(input)
)
The actual_output is an optional parameter because some systems (such as RAG retrievers) does not require an LLM output to be evaluated.
Expected Output
The expected_output is an optional parameter and represents you would want the ideal output to be. Note that this parameter is optional depending on the metric you want to evaluate.
The expected output doesn't have to exactly match the actual output in order for your test case to pass since deepeval uses a variety of methods to evaluate non-deterministic LLM outputs. We'll go into more details in the metrics section.
# A hypothetical LLM application example
import chatbot

input = "Why did the chicken cross the road?"

test_case = LLMTestCase(
    input=input,
    actual_output=chatbot.run(input),
    expected_output="To get to the other side!"
)
Context
The context is an optional parameter that represents additional data received by your LLM application as supplementary sources of golden truth. You can view it as the ideal segment of your knowledge base relevant as support information to a specific input. Context is static and should not be generated dynamically.
Unlike other parameters, a context accepts a list of strings.
# A hypothetical LLM application example
import chatbot

input = "Why did the chicken cross the road?"

test_case = LLMTestCase(
    input=input,
    actual_output=chatbot.run(input),
    expected_output="To get to the other side!",
    context=["The chicken wanted to cross the road."]
)Retrieval Context
The retrieval_context is an optional parameter that represents your RAG pipeline's retrieval results at runtime. By providing retrieval_context, you can determine how well your retriever is performing using context as a benchmark.
class RetrievedContextData(BaseModel):
    context: str
    source: str
# A hypothetical LLM application example
import chatbot
input = "Why did the chicken cross the road?"
test_case = LLMTestCase(
input=input,
actual_output=chatbot.run(input),
expected_output="To get to the other side!",
context=["The chicken wanted to cross the road."],
retrieval_context=["The chicken liked the other side of the road better"]
)Tools Called
The tools_called parameter is an optional parameter that represents the tools your LLM agent actually invoked during execution. By providing tools_called, you can evaluate how effectively your LLM agent utilized the tools available to it.
class ToolCall(BaseModel):
    name: str
    description: Optional[str] = None
    reasoning: Optional[str] = None
    output: Optional[Any] = None
    input_parameters: Optional[Dict[str, Any]] = None
A ToolCall object accepts 1 mandatory and 4 optional parameters:
name: a string representing the name of the tool.- [Optional]
description: a string describing the tool's purpose. - [Optional]
reasoning: A string explaining the agent's reasoning to use the tool. - [Optional]
output: The tool's output, which can be of any data type. - [Optional]
input_parameters: A dictionary with string keys representing the input parameters (and respective values) passed into the tool function.
# A hypothetical LLM application example
import chatbot

test_case = LLMTestCase(
    input="Why did the chicken cross the road?",
    actual_output=chatbot.run(input),
    # Replace this with the tools that were actually used
    tools_called=[
        ToolCall(
            name="Calculator Tool",
            description="A tool that calculates mathematical equations or expressions.",
            input={"user_input": "2+3"},
            output=5
        ),
        ToolCall(
            name="WebSearch Tool",
            reasoning="Knowledge base does not detail why the chicken crossed the road.",
            input={"search_query": "Why did the chicken crossed the road?"},
            output="Because it wanted to, duh."
        )
    ]
)Expected Tools
The expected_tools parameter is an optional parameter that represents the tools that ideally should have been used to generate the output. By providing expected_tools, you can assess whether your LLM application used the tools you anticipated for optimal performance.
# A hypothetical LLM application example
import chatbot

input = "Why did the chicken cross the road?"

test_case = LLMTestCase(
    input=input,
    actual_output=chatbot.run(input),
    # Replace this with the tools that were actually used
    tools_called=[
        ToolCall(
            name="Calculator Tool",
            description="A tool that calculates mathematical equations or expressions.",
            input={"user_input": "2+3"},
            output=5
        ),
        ToolCall(
            name="WebSearch Tool",
            reasoning="Knowledge base does not detail why the chicken crossed the road.",
            input={"search_query": "Why did the chicken crossed the road?"},
            output="Because it wanted to, duh."
        )
    ]
    expected_tools=[
        ToolCall(
            name="WebSearch Tool",
            reasoning="Knowledge base does not detail why the chicken crossed the road.",
            input={"search_query": "Why did the chicken crossed the road?"},
            output="Because it needed to escape from the hungry humans."
        )
    ]
)
Token cost
The token_cost is an optional parameter and is of type float that allows you to log the cost of a particular LLM interaction for a particular LLMTestCase. No metrics use this parameter by default, and it is most useful for either:
- Building custom metrics that relies on
token_cost - Logging
token_coston Confident AI
from deepeval.test_case import LLMTestCase

test_case = LLMTestCase(token_cost=1.32, ...)
Completion Time
The completion_time is an optional parameter and is similar to the token_cost is of type float that allows you to log the time in SECONDS it took for a LLM interaction for a particular LLMTestCase to complete. No metrics use this parameter by default, and it is most useful for either:
- Building custom metrics that relies on
completion_time - Logging
completion_timeon Confident AI
from deepeval.test_case import LLMTestCase

test_case = LLMTestCase(completion_time=7.53, ...)
Including Images
By default deepeval supports passing both text and images inside your test cases using the MLLMImage object. The MLLMImage class in deepeval is used to reference multimodal images in your test cases. It allows you to create test cases using local images, remote URLs and base64 data.
from deepeval.test_case import LLMTestCase, MLLMImage

shoes = MLLMImage(url='./shoes.png', local=True)
blue_shoes = MLLMImage(url='https://shoe-images.com/edited-shoes', local=False)

test_case = LLMTestCase(
    input=f"Change the color of these shoes to blue: {shoes}",
    expected_output=f"Here's the blue shoes you asked for: {expected_shoes}"
    retrieval_context=[f"Some reference shoes: {MLLMImage(...)}"]
)MLLMImage Data Model
Here's the data model of the MLLMImage in deepeval:
class MLLMImage:
    dataBase64: Optional[str] = None
    mimeType: Optional[str] = None
    url: Optional[str] = None
    local: Optional[bool] = None
    filename: Optional[str] = None
You MUST either provide url or dataBase64 and mimeType parameters when initializing an MLLMImage. The local attribute should be set to True for locally stored images and False for images hosted online (default is False).
Label Test Cases For Confident AI
If you're using Confident AI, these are some additional parameters to help manage your test cases.
Name
The optional name parameter allows you to provide a string identifier to label LLMTestCases and ConversationalTestCases for you to easily search and filter for on Confident AI. This is particularly useful if you're importing test cases from an external datasource.
from deepeval.test_case import LLMTestCase

test_case = LLMTestCase(name="my-external-unique-id", ...)
Tags
Alternatively, you can also tag test cases for filtering and searching on Confident AI:
from deepeval.test_case import LLMTestCase

test_case = LLMTestCase(tags=["Topic 1", "Topic 3"], ...)
Using Test Cases For Evals
You can create test cases for three types of evaluation:
- End-to-end - Treats your LLM app as a black-box, and evaluates the overall system inputs and outputs. Your test case lives at the system level and covers the entire application
- Component-level - Evaluates individual components within your LLM system using the
@observedecorator. Your test case lives at the component level and focuses on specific parts of your system - One-Off Standalone - Executes individual metrics on single test cases for debugging or custom evaluation pipelines
Click on each of the links to learn how to use test cases for evals.
FAQs
Which LLMTestCase parameters are required?
input and actual_output are always mandatory. Every other parameter — expected_output, context, retrieval_context, tools_called, and so on — is optional and only needed by the specific metrics you're running.What's the difference between context and retrieval_context?
context is the ideal, static ground truth for an input (usually from your dataset), while retrieval_context is what your RAG pipeline actually retrieved at runtime. Comparing the two is how you measure retriever quality.When should I use a single-turn test case vs a multi-turn one?
LLMTestCase for a single, atomic interaction (one request and response). Use a ConversationalTestCase when you need to evaluate a back-and-forth conversation across multiple turns.Can I evaluate precomputed outputs instead of generating them live?
Can a test case include images?
MLLMImage objects (local files, remote URLs, or base64) into the input or actual_output and deepeval automatically treats it as a multimodal test case for multimodal-supported metrics.How do I organize and search test cases across a team or keep them on the cloud?
name and tags for filtering. If your team wants a shared, cloud-hosted view, those same labels carry over to Confident AI, where you can search, filter, and visualize test cases and their results in a UI — useful when importing from external data sources or collaborating across a team. It's optional and your test cases run identically without it.